
Outlook Online Archive for
Microsoft 365 Explained
When your email storage gets too full, you might find yourself unable to send or receive new messages. Another problem with large mailboxes is that it makes Outlook slower to open. To address this, we can utilise Online Archives in Outlook.
Online Archive mailboxes are accessible for Microsoft 365 users who have the appropriate license. The benefit of online archives, also called In-Place archives, is that they automatically store older emails in a separate archive mailbox.
In this guide, we’ll explore how to activate archive mailboxes, what you need to do so, and how to make the most of them.
What is Outlook Online Archive?
Before delving into the requirements and usage of the Online Archive, let’s first clarify what Outlook Online Archive entails and how it differs from a regular archive.
Outlook Online Archive is essentially an online storage space specifically designated for archiving emails. Here are a few key distinctions:
- It’s accessible only when connected to the internet.
- Data isn’t stored locally on the user’s device, which helps conserve disk space.
- It operates as a distinct mailbox, separate from the primary one.
By transferring emails to the In-place archive, you can effectively free up storage space on the user’s device. This action not only aids in speeding up Outlook’s loading time but also assists in mailbox organisation since, by default, Outlook only scans the primary mailbox.
Online Archive vs Archive folder
In every Outlook mailbox, you’ll find an Archive folder. Users have the option to transfer emails to this folder to declutter their inbox or utilise the Archive button for this purpose. It’s important to note that the Archive folder is integrated within the user’s primary mailbox, distinguishing it from the Online Archive.
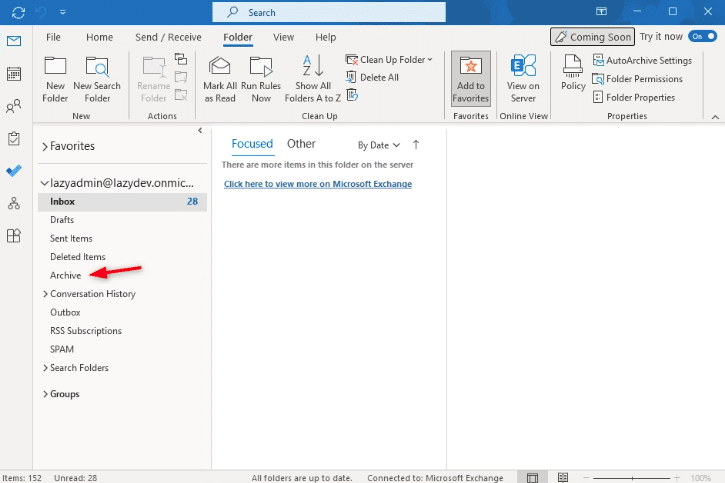
This means that it doesn’t reduce the mailbox size and that email items in the archive are still displayed in the search result.
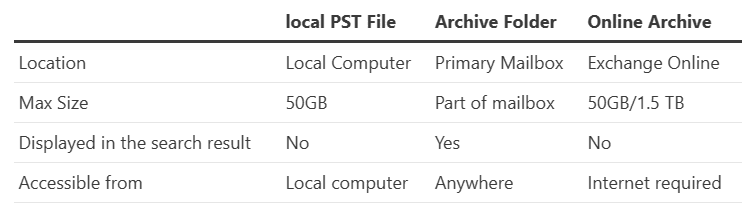
You can also archive your mail to local PST files. The problem with PST files is that you will need to be sure that they are backed up. Otherwise, you risk losing data when the user’s device is lost or the hard drive crashes.
Another problem with PST files is that they can only be accessed from the computer where the PST file is located. The online archive, for example, can also be accessed from Outlook Online or the Outlook App.
Exchange Online Archiving License
The Exchange Online Archive is available with most Microsoft 365 plans. Depending on your license you will have access to either 50GB or 1.5TB of archiving space.
The following plans have access to 50GB of archive space within your current mailbox:
- Microsoft 365 Business Basic
- Microsoft 365 Business Standard
- Microsoft 365 E1
And the plans below have an Online Archive of 1.5TB:
- Microsoft 365 Business Premium
- Microsoft 365 E3
- Microsoft 365 E5
- Microsoft 365 E3
- Microsoft 365 E5
Shared and Resource mailboxes also have an Exchange Online Archive mailbox, but these are limited to 50GB. If you need a larger archive for a shared mailbox you will need to assign an E3 or E5 license to the mailbox.
Note
Online Archive mailboxes can’t be used anymore for journaling or bulk archiving methods (like the use of transport rules). Microsoft has applied a growth limit of 1 GB per day for archiving mailboxes. The archive mailbox can only be used by the individual user or shared-mailbox it belongs to.
Enable Archive Mailbox in Microsoft 365
The Exchange Online Archive is enabled by default for your users. When you want to use the online archive you will have to enable it either per user or for your entire organisation. To enable it we can either use the Microsoft Exchange Admin Center or PowerShell.
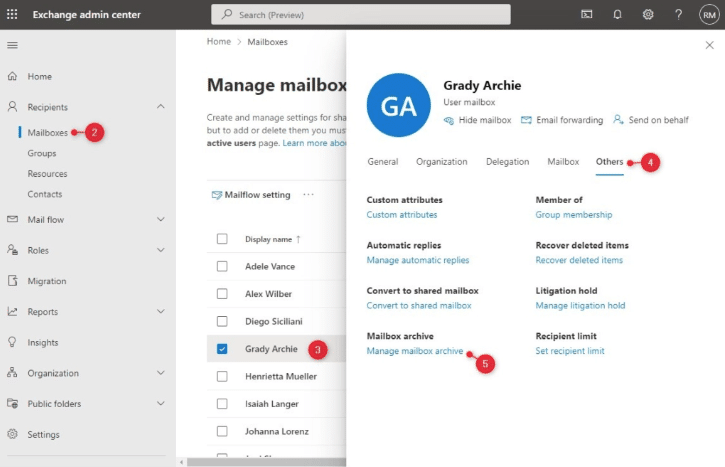
The only downside from the Exchange Admin Center is that you will need to enable it per user:
- Open the Exchange Admin Center
- Expand Recipients and select Mailboxes
- Click on the user
- Click on Others
- Open Manage mailbox Archive
- Enable the Mailbox Archive
Using PowerShell to enable Online Archive
These methods are great if you only need to enable the archive mailbox for a couple of Microsoft 365 users. When you want to enable the archive mailbox for all or multiple users in your organisation, you can better use PowerShell.
The online archive mailbox needs to be enabled per mailbox. The advantage of PowerShell is that we can easily select all users or a group of users. First, open PowerShell and connect to Exchange Online:
- # Connect to Exchange Online
- Connect-ExchangeOnline -UserPrincipalName ruud@lazyadmin.nl
To enable the archive mailbox for a single user we can use the following PowerShell command:
Enable-Mailbox -Identity ruud@lazyadmin.nl -Archive
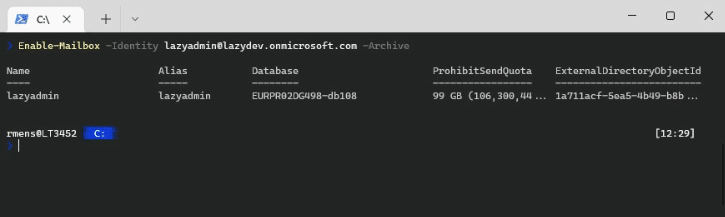
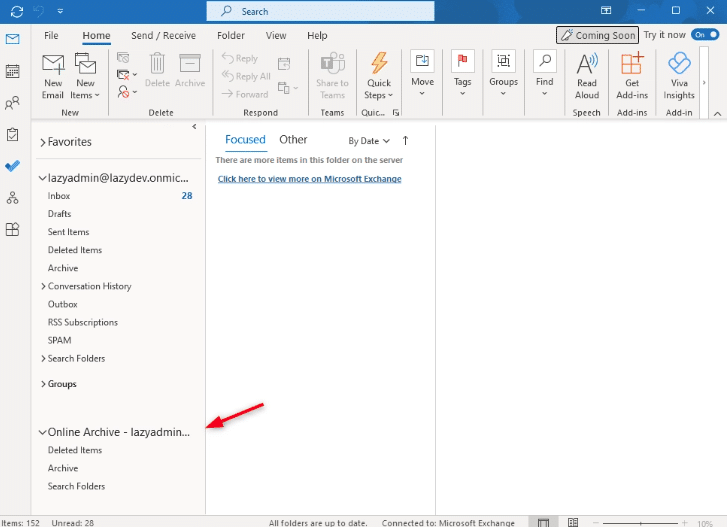
After you have enabled the Online Archive it will become visible in Outlook below the primary mailbox. Sometimes the user needs to restart Outlook before they are able to access the online archive.
To enable the archive mailbox for all users we can first get all mailboxes that don’t have an archive GUID set, which indicates that an archive mailbox isn’t active. And filter the selection on only user mailboxes.
# You can first verify the list of mailboxes with:
Get-EXOMailbox -Filter {ArchiveStatus -Eq "None" -AND RecipientTypeDetails -eq "UserMailbox"} | ft

# Enable archive mailbox for all users:
Get-EXOMailbox -Filter {ArchiveStatus -Eq "None" -AND RecipientTypeDetails -eq "UserMailbox"} | Enable-Mailbox -Archive
Enable Auto-Expanding Archive
When your online archive is running out of storage you can enable auto-expanding archive if your license supports it. Auto-Expanding Archive can be enabled for the whole tenant or for a specific user. There are however some restrictions that you will need to keep in mind before enabling it:
- You can’t turn it off after you enabled it
- Recovering or restoring an inactive mailbox isn’t possible when auto-expand archive is enabled for that mailbox. You will need to use content search to recover it (or a third-party backup solution)
- It can take up to 30 days until additional storage is provided
Make sure that you are connected to Exchange Online in PowerShell and run the following command to enable auto-expanding archive for every user in your tenant:
# Connect to Exchange Online
Connect-ExchangeOnline -UserPrincipalName ruud@lazyadmin.nl

# Enable auto-expanding archive
Set-OrganizationConfig -AutoExpandingArchive
You can verify the setting with the following command:
Get-OrganizationConfig | select AutoExpandingArchiveEnabled
When auto-expanding is enabled for your organisation it will automatically enable it for new and existing mailboxes in your tenant.
Get-OrganizationConfig | select AutoExpandingArchiveEnabled
Using the exchange Online Archive
Archiving of mailbox items is done based on policies. The default policy, which is applied to all mailbox folders, is to move the item (email) after 2 years to the online archive.
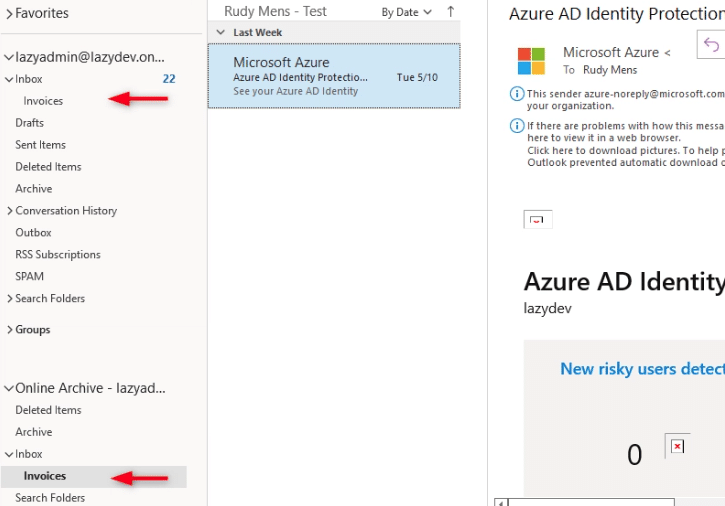
Good to know is that the folder structure of your inbox is automatically re-created in the Online Archive. So if you have for example a subfolder Invoices in your Inbox, then you will get the same subfolder in the Online Archive:
Manually Move Items To Online Archive
It’s also possible to manually move items to the Online Archive. This is useful when you want to clean up your mailbox or are running out of storage space.It’s also possible to manually move items to the Online Archive. This is useful when you want to clean up your mailbox or are running out of storage space.
- Select the items that you want to move to the Online Archive
- Right-click on the selected items
- Choose Move and select the Inbox – Online Archive folder
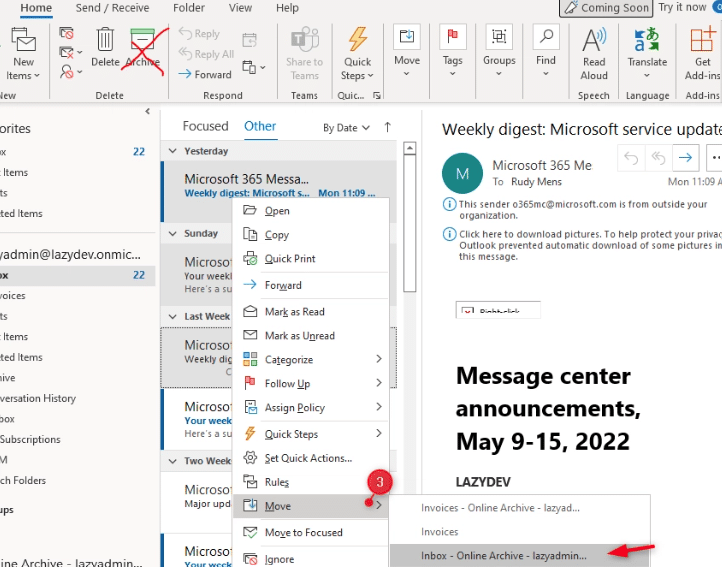
Don’t use the Archive button in the toolbar, because that will move the selected items to the archive folder in the primary inbox.
Exchange Online archiving Policies
Exchange Online Archiving is based on policies. The default policy that is applied to all mailbox folders is “move to archive after 2 years”. This means that emails will automatically be moved to the Outlook Online Archive 2 years after you receive or send them.
There are 4 possible archiving policies that you can currently apply to your mailbox folders:
- Use Parent Folder Policy (2 years)
- 1 Year
- 5 Year
- Never
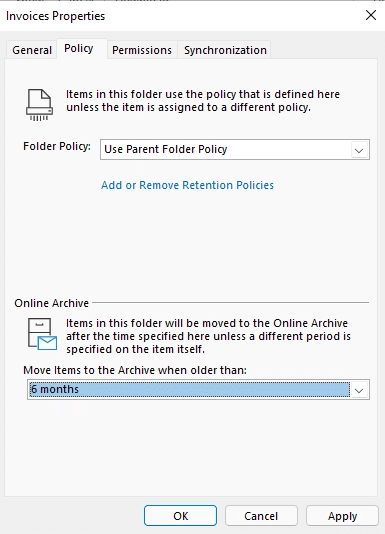
It’s possible to change the policy in your inbox or on a subfolder. You could for example archive all inbox items after the default 2 years, but the invoice after 1 year.
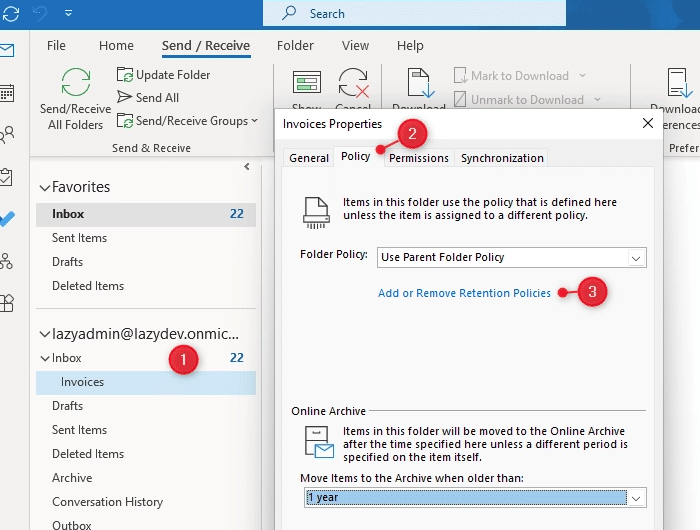
- Right-click on the folder and select Properties
- Open the Policy tab
- Change the Online Archive Policy to 1 year

Add or change Exchange Archiving Policies
So to change the default policy or add a new policy you will need to use PowerShell. To view the existing retention policies we can use the following cmdlet:
# First connect to exchange online
Connect-ExchangeOnline -UserPrincipalName ruud@lazyadmin.nl

# Get all archiving policies
Get-RetentionPolicyTag | where {$_.RetentionAction -eq 'MoveToArchive'}

# Result
Name                                      Type             Description
----                                      ----             -----------
Recoverable Items 14 days move to archive RecoverableItems Managed Content Settings
Default 2 year move to archive            All              Managed Content Settings
Personal 1 year move to archive           Personal         Managed Content Settings
Personal never move to archive            Personal         Managed Content Settings
Personal 5 year move to archive           Personal         Managed Content Settings
When the default policies are not sufficient, then it’s possible to add a new policy using PowerShell. There are a couple of parameters important:
- RetentionEnabled – Enable or disables a policy rule in Outlook
- AgeLimitForRetention – Apply policy after x days
- RetentionAction – set to MoveToArchive for Online archiving
- Type – Personal or use All when you are creating a new default policy
To archive the email items after 6 months we can create the following policy for example:
New-RetentionPolicyTag "Personal 6 months move to archive" -Type Personal -RetentionEnabled $true -AgeLimitForRetention 180 -RetentionAction MoveToArchive
We can also set or change the default policy. Let’s say you want to move all items to the archive after 1 year by default.
# Create a new default policy
New-RetentionPolicyTag "Company Default 1 year move to archive" -Type All -RetentionEnabled $true -AgeLimitForRetention 365 -RetentionAction MoveToArchive
Using The New Policy
The new policy won’t be listed in Outlook by default. The user will first have to add the new policy to their mailbox account.
- Right-Click on a mailbox and choose Properties
- Open the Policy tab
- Click on Add or Remove Retention Policies
Outlook Online will open in the Settings screen.
- Click on Add new policy
- Select the newly created policy and click save
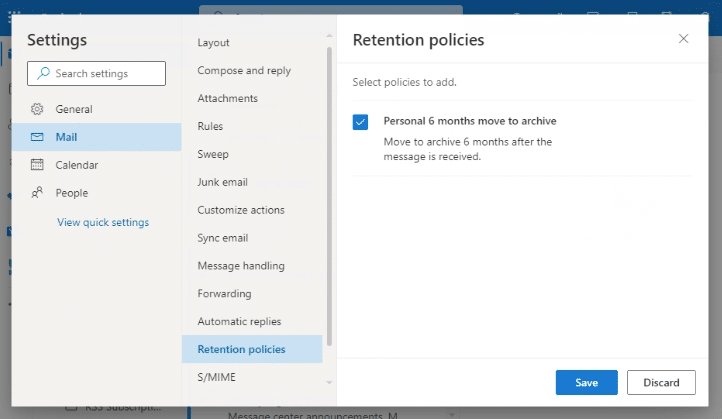
You can now use the newly created policy in Outlook and Outlook Online. Go back to the folder properties in Outlook (close the properties and re-open them). The policy to move the items after 6 months is now available under Online Archive
Searching in Online Archive
When you search for an item in Outlook it will by default search in the current mailbox. To search in the online Archive as well you will need to select All Mailboxes next to the search field.

When you only want to search through the online archive, you will first need to select the Online Archive in the folder list, and then start the search.
Our Final Word
Using the Outlook online archive is a great way to reduce the mailbox space and keep your inbox clean. Make sure that you inform your users about the policies and when emails are moved to the archive folder.
The default Exchange Online Archiving policies are for most situations more than fine, they give a nice balance in quickly finding emails when users are searching and keeping the primary mailbox at a decent size.
If you’d like to chat with us about how we can help your business, get in touch.